Hints and Tips
Taking Panorama Photographs
12/02/2019

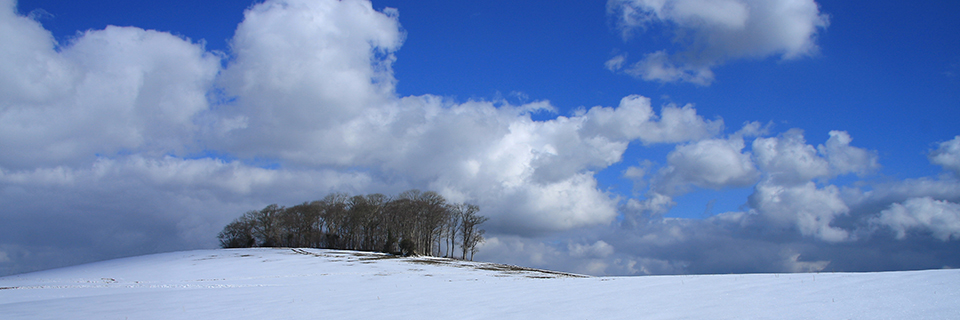
Mourne Mountains, Co Down, Northern Ireland
This article describes my approach to taking successful panorama photographs.
What are panorama photographs, and why take them?
In essence, panorama photographs are wider and narrower than the typical view captured by most SLR cameras, which tends to be in a length by depth ratio of 3 to 2. For example, the panorama photographs displayed in this site are in the ratio of either 3 to 1, 4.5 to 1, or the wider ratio of 6 to 1.
So, why take panorama photographs? In many ways, panorama photographs reflect more accurately how we see the landscape, because we tend to take in quite a wide view rather than the narrower view of a more traditional photograph. Therefore, I think panorama photographs capture in a much better way the experience we have when we we are out in the landscape. However, equally importantly, panorama photographs look spectacular when they are printed and hung on the wall.
Two Approaches
Panorama photographs can be produced in two main ways. The first way is to take a single "ordinary" photograph with the intention of cropping it later to create a panorama image. This can work, particularly if the panarama image is not very long and thin (for example a ratio of 2 to 1 or 3 to 1), or if the light conditions are changing quickly and you don't want to miss that fleeting moment that can come along from time to time. A disadvantage of this approach is that even if you are using a very wide angle lens it will not be possible to capture very wide panoramas, such as the photograph above - this photograph and the others in my extra wide gallery are in a ratio of 6 to 1. Another, and important, disadvantage of the single shot approach is that you are reducing considerably (perhaps by as much as half or more) the number of pixels in the final image, with the resulting reduction in image quality and acceptable print size. However, if this approach is to be adopted, use a wide angle lens, and when composing the photograph keep in mind the panarama that you intent to create.
The photograph below was taken using this approach. I had visualised this composition when taking the photograph, and knew how I was going to crop it later.
The second approach is to take a number of overlapping images with the intention of merging them into a single panorama image using the "photomerge" facility within Photoshop Elements, or similar software designed specifically for this purpose. The number of photographs you take will be determined by the width of the scene you wish to photograph. This is my preferred approach as it has much more flexibility in terms of the width of scene that can be included. It also produces images with considerably more pixels, resulting in pictures with higher resolution and clarity even at large print sizes. It is this second approach that I describe in the remainder of this article.
Equipment
There will be differing views on the equipment needed to capture panoramic photographs successfully. My view is that the minimum requirements are actually quite modest. All that is needed is a camera that can be controlled manually, and a tripod - preferably one with a tilt and pan head.
It is also possible to get special panorama heads for your tripod. However, these are really only necessary if there are objects close to the camera to be included in your panorama. A panorama head helps to avoid something known as "parallax error". To demonstrate how parallax error works, stretch out your arm and hold one finger in the air. If you close one eye and look at your finger, and then do the same with your other eye, you will see that your finger appears to shift when seen against an object in the background. This effect can cause problems with foreground objects when software tries to align the individual images in your panorama. However, as I say above, in most cases a panorama head is not really necessary - for example, all of the panorama and extra wide panorama photographs on this site were taken using a normal pan and tilt head.
The Picture Taking Process
I have summarised below the main things to consider when taking multi-image panorama photographs.


Stitching the Panorama
If the guidelines outlined above have been followed, the stitching process at the computer should be straightfortward and successful. The process that I summarise below is based on using Photoshop Elements, but similar processes would apply to other software packages.
You can then sit back and enjoy your handiwork!!
If you have any questions or comments on the contents of this article, contact me here...
To return to the "Panorama Landscape Photographs" galleries click here...
In essence, panorama photographs are wider and narrower than the typical view captured by most SLR cameras, which tends to be in a length by depth ratio of 3 to 2. For example, the panorama photographs displayed in this site are in the ratio of either 3 to 1, 4.5 to 1, or the wider ratio of 6 to 1.
So, why take panorama photographs? In many ways, panorama photographs reflect more accurately how we see the landscape, because we tend to take in quite a wide view rather than the narrower view of a more traditional photograph. Therefore, I think panorama photographs capture in a much better way the experience we have when we we are out in the landscape. However, equally importantly, panorama photographs look spectacular when they are printed and hung on the wall.
Two Approaches
Panorama photographs can be produced in two main ways. The first way is to take a single "ordinary" photograph with the intention of cropping it later to create a panorama image. This can work, particularly if the panarama image is not very long and thin (for example a ratio of 2 to 1 or 3 to 1), or if the light conditions are changing quickly and you don't want to miss that fleeting moment that can come along from time to time. A disadvantage of this approach is that even if you are using a very wide angle lens it will not be possible to capture very wide panoramas, such as the photograph above - this photograph and the others in my extra wide gallery are in a ratio of 6 to 1. Another, and important, disadvantage of the single shot approach is that you are reducing considerably (perhaps by as much as half or more) the number of pixels in the final image, with the resulting reduction in image quality and acceptable print size. However, if this approach is to be adopted, use a wide angle lens, and when composing the photograph keep in mind the panarama that you intent to create.
The photograph below was taken using this approach. I had visualised this composition when taking the photograph, and knew how I was going to crop it later.
The second approach is to take a number of overlapping images with the intention of merging them into a single panorama image using the "photomerge" facility within Photoshop Elements, or similar software designed specifically for this purpose. The number of photographs you take will be determined by the width of the scene you wish to photograph. This is my preferred approach as it has much more flexibility in terms of the width of scene that can be included. It also produces images with considerably more pixels, resulting in pictures with higher resolution and clarity even at large print sizes. It is this second approach that I describe in the remainder of this article.
Equipment
There will be differing views on the equipment needed to capture panoramic photographs successfully. My view is that the minimum requirements are actually quite modest. All that is needed is a camera that can be controlled manually, and a tripod - preferably one with a tilt and pan head.
It is also possible to get special panorama heads for your tripod. However, these are really only necessary if there are objects close to the camera to be included in your panorama. A panorama head helps to avoid something known as "parallax error". To demonstrate how parallax error works, stretch out your arm and hold one finger in the air. If you close one eye and look at your finger, and then do the same with your other eye, you will see that your finger appears to shift when seen against an object in the background. This effect can cause problems with foreground objects when software tries to align the individual images in your panorama. However, as I say above, in most cases a panorama head is not really necessary - for example, all of the panorama and extra wide panorama photographs on this site were taken using a normal pan and tilt head.
The Picture Taking Process
I have summarised below the main things to consider when taking multi-image panorama photographs.
- Ensure that your tripod is totally level by adjusting individual legs if necessary - there should a bubble level on your tripod body to help you to do this. Then make sure that the camera is perfectly level - some cameras have an electronic spirit level that can be displayed on the rear screen, but if not a levelling cube can be attached to the camera's hot shoe mount. It is important that everything is level when you are panning to take individual photographs in your panorama, otherwise it will be difficult, if not impossible, to stitch the photographs together successfully later in the process.
- Next, I would recommend taking the individual photographs in portrait rather than in landscape mode. While it can be done either way, shooting in portrait mode has a number of advantages. First, it enables more height to be captured in the panorama, perhaps to include more of the sky. Second, as more photographs need to be taken to cover the width of the view chosen, there will be an increase in the number of pixels in the final image with the resulting increased resolution and image quality.
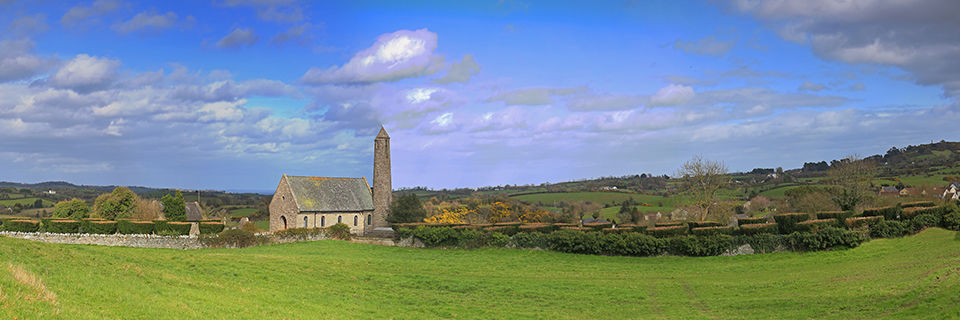
- The camera should be set to manual operation. This means manual exposure, manual focus and manual white balance. It is important that these basic settings remain the same across all of the individual images when they are being taken. Changes that could be made by automatic settings as individual photographs are taken could make it very dificult for a seamless join to be achieved between those images in the final panorama. Even when this approach is followed, it can be tricky to take successful panorama images if the light conditions are changing very quickly, for example if clouds are crossing the sun on a windy day, and I have had occasions where the change in lighting conditions is obvious across the width of the final panorama - see the photograph of Saul Church below, where the tower of the church is lit differently from the body of the church! Also, the actual position of the sun can be an issue, particularly when taking wider panorama photographs, because as you pan the camera around you could end up with part of the panorama being taken into the sun - see the photograph of Inch Abbey below. So, it may be that you have to return to take your panorama photograph at another time of day or when the lighting is more "co-operative"! I was not happy with either of these photographs, and returned at different times to take more pleasing photographs which are in the panorama galleries in this site.
- For similar reasons, it is better not to use a polarising filter when taking panorama photographs using the multi photograph method. The degree to which a polarising filter has an affect on photographs is determined by the angle of the sun relative to the way the camera is pointing. As this angle will change as you pan to take your various photographs, the affect will differ between photographs, hampering a successful stitch later in the process.
- However, it is fine to use neutral density graduated filters, as you would in the normal way, to balance exposure levels between the sky and the land.
- Regarding exposure, take some trial photographs at different parts of the scene you intend to include in your panorama, and use a reading somewhere in the middle, or an exposure that helps to ensure that highlights are not "blown". It is worth noting that depending on where the sun is positioned relative to the panorama view you want to capture, the range of exposure values across the panorama may be very high - perhaps even unacceptably high. This is more of an issue than when taking a "normal" single photograph, and it may be necessary to take the panorama at a different time of day when the sun is at a more "forgiving" angle.
- When panning to take the individual photographs required, it is important to overlap the images. However, there are different opinions on how much of an overlap there should be. I tend to use a 50% overlap; while this is probably excessive, it has always given me very good results at the stitching stage. A good tip is, when panning from left to right, to line up the left hand edge of the viewfinder with the part of the scene that the central focus point covered in the previous photograph. This will ensure a 50% overlap.
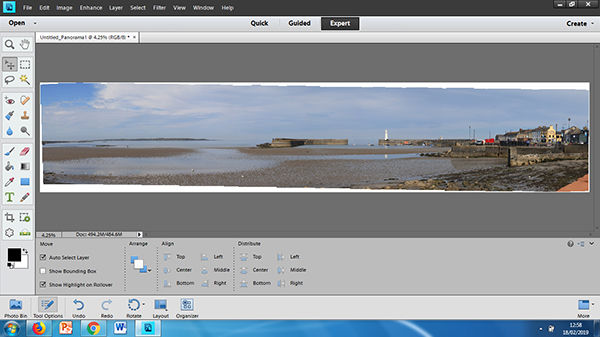
- When taking the individual photographs, it is a good idea to take an extra photograph at either side of your intended composition, and to leave some space above and below things that you want to include in your composition. This is because when the images are stitched together by the software, it is normal that the final image does not form a perfect rectangle, and some cropping is required around the edges - the photograph below demonstrates what it looks like prior to cropping.
- Finally, there is no real limit to the number of individual photographs that can be included in making a single panorama. I tend to take up to 11 or 12 portrait photographs, and this is sufficent to produce panorama photographs in a 6 to 1 ratio. An advantage is that once a panorama of this ratio has been produced, it can be used as the basis for photographs of different ratios. For example, the two photographs below show how I have cropped the same "base" photograph to produce a 6 by 1 image and a 3 by 1 image. Notice that it has been possible to include more foreground in the 3 by 1 version, but this image does not stretch as far to the left.
Stitching the Panorama
If the guidelines outlined above have been followed, the stitching process at the computer should be straightfortward and successful. The process that I summarise below is based on using Photoshop Elements, but similar processes would apply to other software packages.
- The first thing to do is to prepare your images for the photomerge process. This is really only necessary if you want to use RAW files. If you are converting your RAW files to JPEGs, it is important that any changes you make in RAW are applied equally to all images to be merged. If you are using JPEG files, it is probably better not to make any changes to them prior to the photomerge process, and then to apply any adjustments to the panorama photograph when produced.
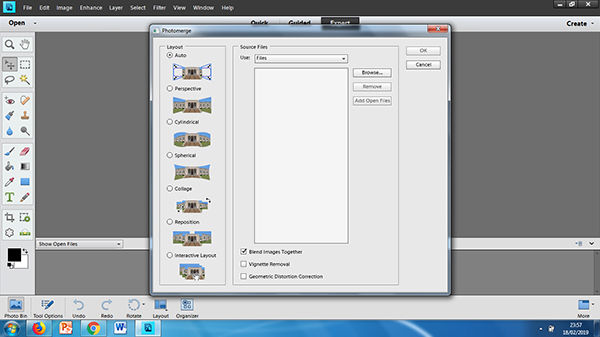
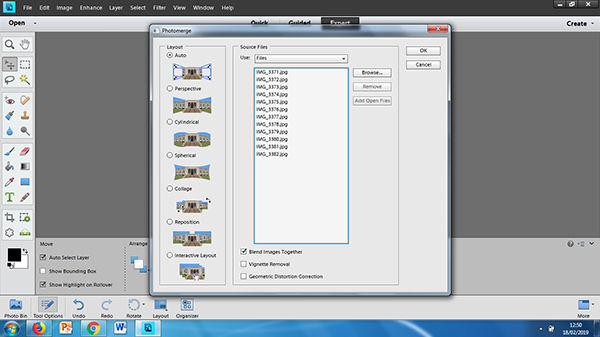
- To start the photomerge process, in Photoshop Elements, click "Enhance" at the top of the screen, and then click "Photomerge", followed by "Photomerge Panorama". The following photomerge dialogue box then opens.
- Click on the "Browse" button and navigate to the folder where your photograph files are stored. Click on the first photograph in your sequence, hold the Ctrl key and click on the other photographs in your sequence, then click "OK". The selected photographs will then appear as source files in the large box in the middle of the screen, as shown below.
- The panel on the left hand side of the photomerge dialogue box shows a range of layout options. Most of the time the "Auto" layout, which is the default option, is the best one to use, and is the one that should certainly be used first. However, if this option does not give a good result, you could start again and try either the "Perspective" or the "Cylindrical" option.
- There are three tick boxes at the bottom centre of the photomerge dialogue box. The first of these, "Blend Images Together", will be ticked already, and should be kept ticked. This tells the software not only to stitch the images together, but also to blend the tones and colours together. The second box, "Vignette Removal", need only be ticked if the corners of your source photographs are darkened, for example by the use of a wide angle lens and/or filters. The third box, "Geometric Distortion Correction", need only be used if a very wide angle lens has been used.
- When you have made all of your selections as described above, click the "OK" button to start the photomerge process. The amount of time this will take will depend on things such as the number of photographs to be merged, and the power, etc of your PC. However, within a few minutes an image such as the following (also shown earlier) should appear.
- The photomerge process is carried out by the software using "Layers". So, the next thing to do is to flatten the layers by clicking "Layer" at the top of the screen, and selecting "Flatten Image" at the bottom of the drop down list. This will also get rid of any fine cracks that are present in the image.
- Then, crop the panorama image to remove any unwanted areas around the edges of the image. I normally do this with the crop tool set to "No Restriction" - this allows the crop to be extended in all directions independently, and ensures that the maximum amount of the photograph can be retained. This can then be used as a master from which other panoramas, perhaps of different ratios, can be produced.
- The final stage is for the photograph to be fine tuned the way you would fine tune any other photograph - for example, using "levels", "saturation", "sharpening", etc.
You can then sit back and enjoy your handiwork!!
If you have any questions or comments on the contents of this article, contact me here...
To return to the "Panorama Landscape Photographs" galleries click here...